Jörgs Linux Pages: GPS Software

Home |
Science and Software |
Motorcycle Pages |
Links
There are no road signs to help navigate.
And, in fact, no one has yet determined which side of the road we're supposed to be on. - Steve Case
This is a short "How-To" on using Garmin MapSource inside a Linux system, including use of the USB connection to the GPS receiver.
Essentially, it makes use of a virtual system based on VirtualBox that is running Microsoft Windows XP as "guest" on the Linux "host".
This description was first written for Fedora Linux 8, then adapted to Fedora 11 and Fedora 14.
Since the same principles apply to other Linux systems, I did not specifically update this page for Debian-based systems — you will simply use
apt instead of yum and adjust the commands accordingly.
The standard software for Garmin GPS units is Garmin MapSource. It is used to plan routes, to upload data (maps, routes,
waypoints etc.) to the GPS receiver and to retrieve track, waypoint and route information from the GPSr.
Garmin MapSource is one of the few applications that still have no equivalent in the Linux world.
Although a dual-boot system is easy to set up, I see no point in rebooting the computer just for a single application.
One solution that is now truly mature is "virtualisation". Essentially, this allows to run one OS, such as Microsoft Windows,
as "guest" inside another OS, the "host" - in my case Linux.
The product that I am using with success is VirtualBox,
a commercial and proprietary (with a limited GPL version) x86 virtualizer. Albeit an open-source version is available,
I had to go for the proprietary release since this was - at that time - the only one that provides USB controller emulation.
Installation is straightforward. In a nutshell, you download the "VirtualBox for Linux Hosts" executable for
your distribution from the manufacturer's website and install it using yum.
A common prerequisite is the Dynamic Kernel Module Support, DKMS:
yum install dkms
This will resolve dependencies and load other packages such as kernel-devel, kernel-headers etc.
If you want to use repositories, you will probably proceed along the following lines:
wget -P /etc/yum.repos.d http://download.virtualbox.org/virtualbox/rpm/rhel/virtualbox.repo
yum install VirtualBox-4.3
... and that's it. Updates are then handled through yum update.
If you prefer a manual installation:
wget http://download.virtualbox.org/virtualbox/4.1.30/VirtualBox-4.1-4.1.30_91550_fedora14-1.i686.rpm
yum --nogpgcheck localinstall VirtualBox-4.1-4.1.30_91550_fedora14-1.i686.rpm
... here, updates need to be downloaded and installed manually, using the same commands.
All that remains is to add the user that is running VirtualBox in the group vboxusers,
either through your User Admin tool or an the command line:
usermod -a -G vboxusers username
After that, you can launch VirtualBox and set up a virtual system, then install the guest operating system -
simply use the Wizard and/or refer to the manual. In my case, the guest is Microsoft Windows XP
and the same procedure works with Windows Vista, 7 and 10.
When the install is complete, do not forget to install the "VirtualBox Guest Additions". Among others, they
provide a video driver that allows re-sizing the Windows window ;-) to any size and at any time.
To exchange data between this Microsoft Windows guest and the Linux host, I use a shared drive (please refer to the manual).
For reasons of security and privacy, I do not allow any Internet connection for the Windows guest.
Moving a virtual Machine is straightforward and is described on the VirtualBox website.
However, one thing you may want to keep in mind is that, in spite of all virtualisation, Microsoft Windows does not transfer easily from one hardware to another:
Windows seems to "memorize" on which hard disk controller it was installed; if the controller changes, the boot will likely fail and you get the infamous BSOD.
The preventive maintenance is to perform a few modifications to the Windows registry, essentially relaxing the IDE checks, before moving the system to another hardware.
This can be done e.g. with the little MergeIDE utility developed by c't, available through the VirtualBox website. The same webpage contains instructions for moving a physical Windows installation into a virtual environment.
At this time, you can install Garmin Mapsource. The only problem that remains is the USB connection to the GPSr,
and it took me one evening to resolve this.
The key problem was that the current user (running VirtualBox) needs access to the USB filesystem, which is by default
not the case in most distributions. A clear symptom was that the USB devices are listed but "greyed out" in the VirtualBox menu.
As usbfs is a virtual filesystem, its permissions can only be changed at boot time.
How this is done in depends on the particular distribution - the VirtualBox manual says it nicely:
"The various distributions are very creative from which script the usbfs filesystem is mounted.
Sometimes the command is hidden in unexpected places."
For Fedora 11, it is sufficient to umount /proc/bus/usb before launching VirtualBox.
See this bug report for an explanation.
For Fedora 8, usbfs is mounted via /etc/rc.sysinit.
The two commented lines below show the original entries; what is added is the mount option -o devgid=500,devmode=664,
where "500" is the numerical group id for the group vboxusers (see /etc/group).
if [ ! -d /proc/bus/usb ]; then
    modprobe usbcore >/dev/null 2>&1 && mount -n -t usbfs -o devgid=500,devmode=664 /proc/bus/usb /proc/bus/usb
    # modprobe usbcore >/dev/null 2>&1 && mount -n -t usbfs /proc/bus/usb /proc/bus/usb
else
    mount -n -t usbfs -o devgid=500,devmode=664 /proc/bus/usb /proc/bus/usb
    # mount -n -t usbfs /proc/bus/usb /proc/bus/usb
fi
Note: For Fedora 8, it is useless to add a mount command for usbfs in /etc/fstab,
and it is not necessary to blacklist garmin_gps in /etc/modprobe.conf either. -
For Ubuntu Linux, the approach is slightly different; see
this thread.
With that, the USB devices should be available to Windows XP and upon connecting the Garmin GPSr the
Hardware Wizard should guide you through the process of installing the Garmin USB drivers.
If you run into problems in this process, please verify the following settings:
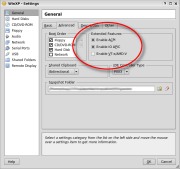
- In VirtualBox > Machine > Settings > General, Tab "Advanced", make sure the Box "Enable IO APIC" is ticked (see screenshot).
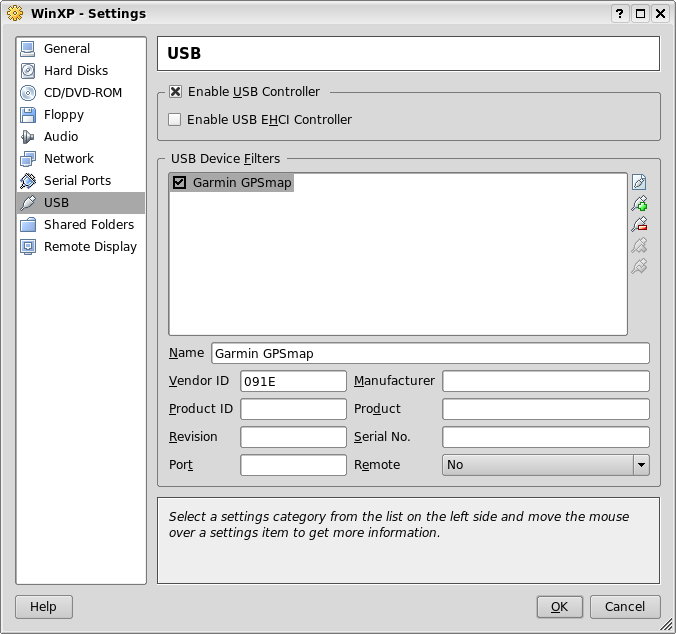
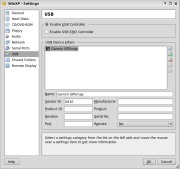
- In VirtualBox > Machine > Settings > USB, make sure the Box "Enable USB Controller" is ticked (see screenshot).
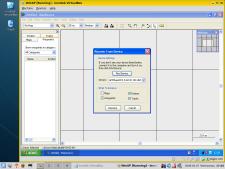
The image below shows the Fedora 8 Desktop, running Microsoft Windows XP in a window,
and this in turn is running Garmin Mapsource in a window ;-)
Note that the "Find Device" dialog is active; my GPSmap 60CS was detected on the USB port.
There was still one additional problem: Albeit Windows XP recognises the connection of the GPSr, MapSource would
not find the device. The solution is to reset (disable and re-enable) the proprietary Garmin USB drivers inside
Microsoft Windows. Probably the most elegant solution was posted in the
VirtualBox forums; in short:
- From the Microsoft support website, download the Windows Device Console
— DevCon — command-line utility.
- Unpack (run) the file and move the 32-bit executable devcon.exe into an appropriate system folder, e.g. c:\windows.
- Every time MapSource does not find your GPSr, run
devcon restart @usb\vid_091e* (e.g. as a batch file).
This command restarts all USB drivers that are made by Garmin ("091e" is the manufacturer code).
If you export track information from Garmin GDB files as text files, the resulting files are tab-delimited, with the coordinates written in lat/long pairs.
The following one-liner extracts coordinates and altitude of a track, leaving a file that can be plotted directly e.g. with gnuplot:
cat /path/to/logfile.txt | grep "^Trackpoint" \
    | awk -F '\t' '{print $2, $4}'
    | tr NSWE +--+ > /path/to/out.dat
To get the axis right, you need to swap the first and second column in gnuplot:
set size ratio 1
splot 'file' using 2:1:3 w lin title ''
unset xtics
unset ytics
Sometimes I like to generate an altitude profile from a GPS track in gpx format.
gpsdings is a java command line
tool for the manipulation and analysis of track and waypoint data.
Among others, it comprises a GPS track analyzer.
To generate a plot of elevation over distance from the file 20080622.gpx:
java -jar gpsdings.jar trackanalyzer --plot "DistanceTravelled|Elevation|20080622.altitude.svg|Jura, 20080622" 20080622.gpx
To generate a kml file for use with Google Earth from the file 20080622.gpx:
java -jar gpsdings.jar trackanalyzer --kml "Elevation|20080622.kml|Jura, 20080622" 20080622.gpx
Or, alternatively (tracks will be coded by their names):
java -jar gpsdings.jar gpxkml -z 20080622.gpx
The gpx files that are exported by Garmin's MapSource are not exactly like I want them to be. Using
GPSBabel,
the following one-liner extracts and merges all the tracks (-x track,merge),
drops any routes (-x nuketypes,routes), plus invokes some more clean-up:
gpsbabel -t -i gpx -f /path/to/infile.gpx \
         -x track,merge,title="Title of Track" -x nuketypes,routes \
         -o gpx -c latin1 -F path/to/outfile.gpx
I have put this into a shell script:  click here to download the gpxclean.sh script.
Sometimes I need to reduce the number of points in a gpx file, but preserve the overall shape of the track.
I found this useful e.g. to create overview maps from large gpx files.
The following one-liner will reduce all points within a radius of 1 km. Applied to a file with more than
40'000 trackpoints (4.5 MB), the resulting track was reduced to about 400 points (45 kB) but still
represented the original track shape very well:
gpsbabel -r -i gpx -f in.gpx -x simplify,error=1km -o gpx -F out.gpx
If, in addition, you want to pack all tracks into one, use something like this:
gpsbabel -r -i gpx -f in.gpx -x simplify,error=1km -x track,pack -o gpx -F out.gpx
Another application: reduce the number of points in a gpx file where the recording rate was (accidentally) much too high.
Here, the error is specified as "5m":
gpsbabel -r -i gpx -f in.gpx -x simplify,error=5m -x track,pack -o gpx -F out.gpx
To create overview maps for multi-day trips, I like to merge them into a single file (which is easier to handle than multiple gpx files).
However, you still have to specify the individual lines on the command line since gpsbabel does not accept wildcards.
The following bash one-liner creates the required input command and feeds it to gpsbabel:
ff="" && for f in *.gpx; do ff="$ff -f $f"; done && gpsbabel -i gpx $ff -o gpx -F "all.gpx"
A memory-saving technique to carry your favourite tracks with you is to convert them into a transparent overlay map.
This can be achieved by manual import of the tracks into an empty map, then compiling manually ... but since the process
as such does not really require manual interaction, I wrote a Perl script for this purpose.
The script is called gpx2ovl.pl ("gpx to overlay") and takes exactly one gpx file as argument.
By default, it will extract all tracks and convert each of them into a polyline of type "0x0003".
The display of these lines is customised using a TYP file (which is generated on-the-fly).
The result is a complete set of files that can be used directly with MapSource.
Click here to download the gpx2ovl.pl script.
Please note that a number of variables (such as map names, etc) are hardcoded at the beginning of the script;
you may want to change them to suit your needs.
Similar to the above, I wrote a script that converts arbitrary "points of interest" into a transparent overlay map.
Again, this is a Perl script that does not require manual interaction. The script is somewhat more sophisticated than
the previous one, since it will automatically cut large areas into suitable tiles.
The script is called csv2ms.pl ("csv to MapSource") and takes exactly one csv file as argument.
It will parse all coordinate pairs in the file and convert each of them into a [RGN10]-symbol of type "0x1610",
which will show up as a red dot on most Garmin GPSr.
The result is a complete set of files that can be used directly with MapSource.
Download the csv2ms.pl script.
Please note that a number of variables (such as map names, etc) are hardcoded at the beginning of the script;
you may want to change them to suit your needs. - The script was updated 2008-11-30; the maps now work
also with the "infamous" MapSource version 6.14.x.
For most GPS data conversions, I use GPSBabel.
However, for specific cases I usually write specific scripts. Here are some of them.
To convert a comma-delimited list of waypoints to GPX format, I wrote a script called csv2pgx.pl.
The script takes a CSV list of the following structure and writes a GPX file where every line is converted to a separate waypoint.
name TAB address TAB phone TAB latitude, longitude TAB symbol TAB sequence
The last field sequence is special: this number will be prefixed to the waypoint name.
I use this to "sort" my waypoints in their intended order, in particular on longer trips:
numbers with 1xx are be destinations for day 1, 2xx for day 2, ... you get the idea.
Using three-digit numbers allows me to easily add items later without re-numbering:
e.g. the last destination for day 2 may be labeled 295-HotelX or 299-CampgroundSunset.
Download the csv2gpx.pl script.
The onboard navigation system of the Volkswagen Group, as used in VW/Audi/Skoda/Seat cars
(e.g. the Columbus and Bolero systems), is a special case.
These do not use GPX but vCard,
a standard format for electronic business cards ("contacts") ... and interestingly, vCard has a GEO: tag :-)
To convert the same comma-delimited list of waypoints mentioned above to vCard format, I wrote a script called csv2vcard.pl.
This script creates 1 vCard file per "contact" (waypoint) since the onboard navigation system does not seem to recognize concatenated vCards.
The script uses the field sequence in the same way as above, i.e. the files will be named 295-HotelX.vCard or 299-CampgroundSunset.vCard.
Also, the field phone is translated correctly, i.e. you can directly call the number.
Download the csv2vcard.pl script.
To get these vCard files into your car's navigation system, please refer to the user manual.
I will not answer questions in that matter ;-)
